Takeoff and Landing
Start Up Procedure
Understand your bird before you spin her up. There are multiple resources for this. Some of the more important questions to ask:
- Do you have a locking tail wheel?
- What is recommended speed to rotate (lift off from runway)?
- Is this plane single brake or differential brake?
- What engine management concerns are there (Radiators, RPM, Prop Pitch, Manifold Pressure)?
- Do you have all keys mapped given the answers to the above?
The E key is usually bound to the automated start up. Initiate startup and enjoy the show.
For the purposes of this guide we will assume the use of the BF 109 F4. This plane is used by us for it's overall ease of management and use. Many of the systems that would have to be individually managed in other aircraft are automated in the 109.
Take-off Configuration
Before Take-off in the Bf-109 make sure you have your canopy closed and your tail wheel locked. You will need to straighten out your tail wheel for it to actually lock in place. Set your flaps to 20° by extending them until you see two black lines on the flaps on your left wing. Trim your aircraft nose down to +1 on the adjustable stabilizer so that your tail wheel will lift off the ground at the appropriate speed.
Take-off
The Bf-109 has a clockwise rotating propeller when viewed from the cockpit. Due to torque, gyroscopic precession and various aerodynamic effects the plane will have a tendency veer left during take-off. To compensate for this you will need to apply right rudder pressure throughout take-off.
If you are taking off as part of a flight of aircraft make sure to count 6 seconds before following the aircraft in front of you. When you are ready to go, check that the runway is clear and then slowly throttle up to full power. By throttling up slowly you reduce the amount of torque on your aircraft and thus, the amount of compensation needed to stay straight during take-off.
You can rotate at 180 km/h. As soon as you have established a steady climb rate, retract your gear and flaps and reduce your throttle to 1.1 ata or whatever your section leader calls it out to be.
Landing Procedure
Landing Pattern
The landing pattern is a basic concept that you will find spans all aviation. There are multiple forms but most can be distilled into the following steps:
- Upwind Leg
- Crosswind Leg
- Downwind Leg
- Base Leg
- Final
I find it easy to remember by saying "Up to Down" with a "Cross" between up and down. The naming is meant to be self explanatory with the primary assumption being you are landing into the wind. You can either fly your upwind keeping the airfield to you left or you can fly directly over it. Enter the pattern at and altitude of about 500 to 1000 meters. The image below is a good example of a "traffic pattern":
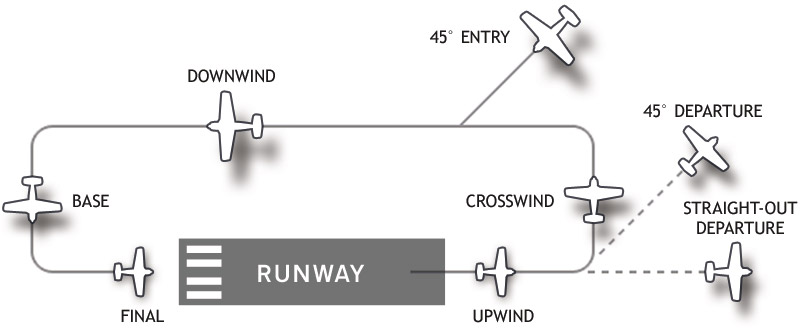
The pattern is an excellent way to bleed off speed and to take time to configure your plane for landing. It also allows you to asses the current traffic situation of the airfield. If you see at any point you will not be able to land you can indefinitely hold "in pattern" until the runway is clear. When you turn on your downwind leg ensure the end of the run way is approximately 45 degrees between your wing and tail. This will should allow you enough time to align yourself to the runway for final.
Landing Configuration
Landing can be a challenging process. You basically want to adhere to the following for the BF 109 F4:
- Downwind
- Prop Pitch on Auto, or 11:30 on manual
- 1500 RPM and .6 ATA
- Tail wheel locked
- Drop Gear once speed is less than 350 km/hr
- Flaps at 20% once speed is less than 250 km/hr
- (Optional) Set Horizontal Stabilizers to somewhere between -4° and -5° before landing.
- Base
- As you complete your base leg ensure you don't drop below an altitude of 150 meters.
- Final
- Approach speed of 200-220 km/hr
- Touchdown at 160 km/hr
Landing
The three important concepts to remember are round out, aiming point and touchdown point. The aiming point is where you place your target reticle. On your final approach your aiming point is end of the runway closest to you. In IL2 Sturmovik there are not markers like you would find on contemporary runways today, however an illustration of todays runways can still help break down the process used by pilots:
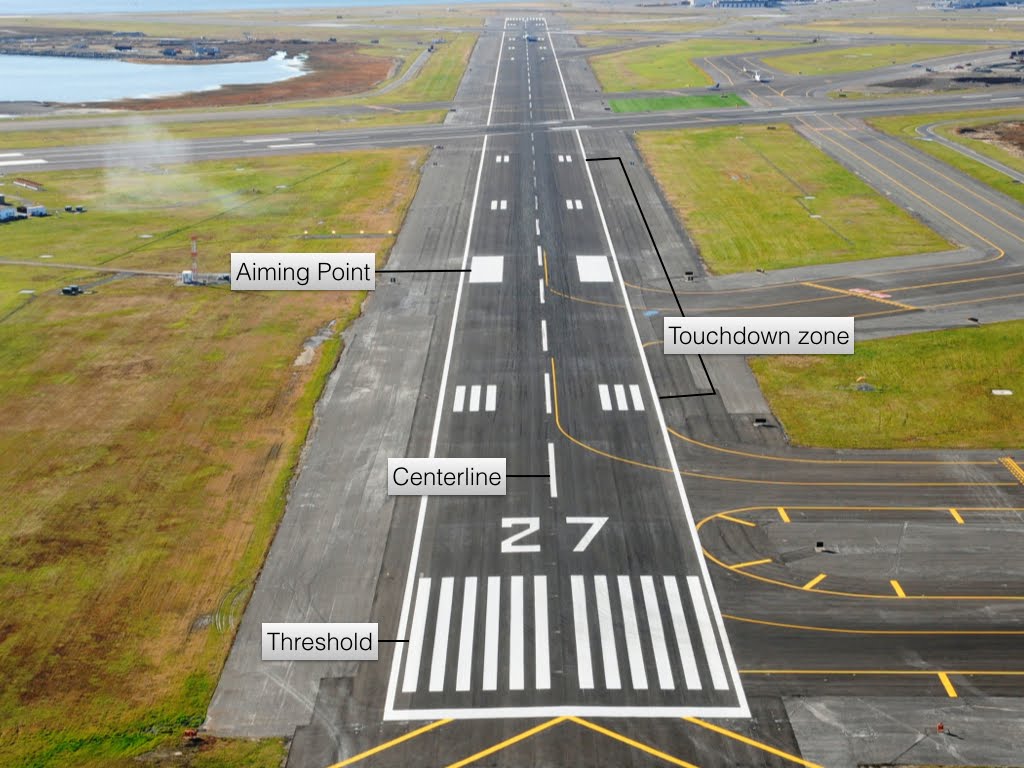
Note above the "fixed distance" marks. This is your "aiming point" during your final. Once you cross the threshold or shortly before, you "round out" by pulling your nose up but reducing power in order to enter a controlled decent. If done properly you should land softly on all three points; both wing wheels and tail wheel (also called a three point attitude).
In IL2 Sturmovik the default aiming point for many is the beginning of the run way or possibly a couple meters before the beginning of the runway. Making your touch down point somewhere approximately around that aiming point. If you speed is too high you may need to adjust your aiming point, decrease throttle, or increase flaps. Never fear coming around for another approach. If you don't feel good about a approach simply throttle up and pull back up into the pattern and try again.